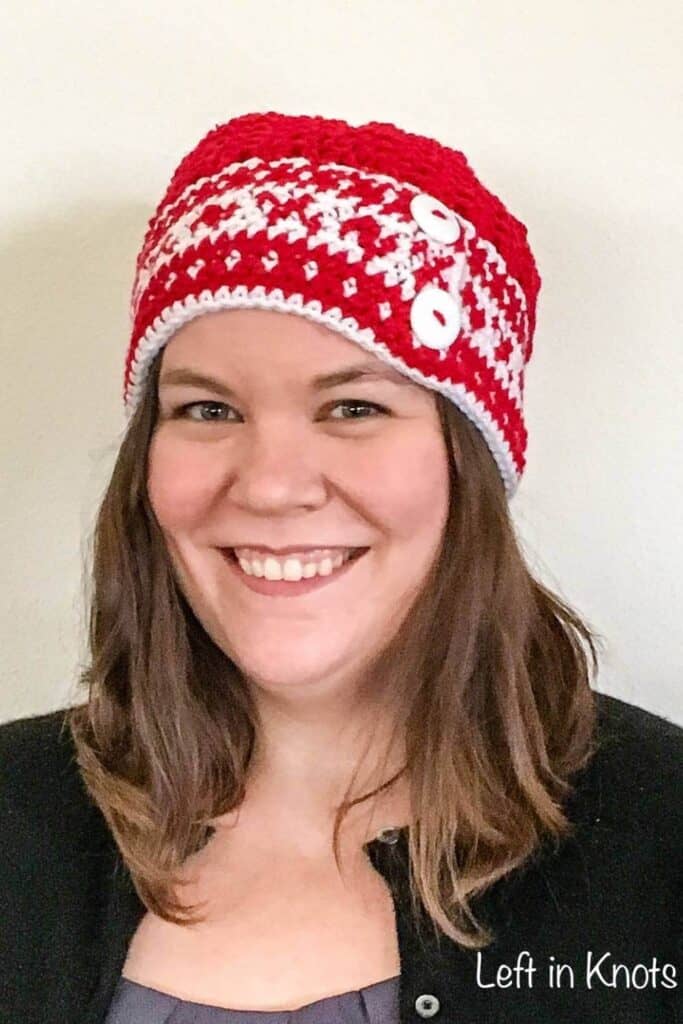
A crochet fair isle hat is easy to make with this free crochet pattern. This hat has a light, slouchy top with a fair isle band accent with buttons. You are going to love wearing this hat in the winter.
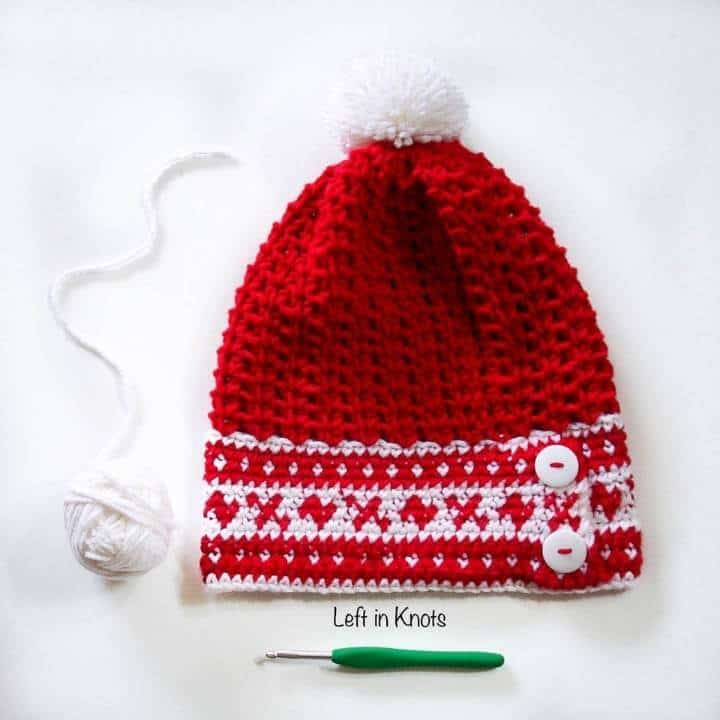
Fair isle is a technique that is often seen in knitting patterns, but it absolutely works with crochet as well. Using tapestry crochet techniques and a simple fair isle design you can make this adorable Fair Isle Banded Slouchy Hat. This hat is a perfect, stylish and modern touch to the snowy weather that is here now!
Show off Your Crochet Projects
Don’t forget to share pictures of your projects with me in my Facebook Group or by tagging @leftinknots on Instagram. I can’t wait to see what you make!
Supplies
- Worsted weight yarn in two colors (less than one skein of each). I used Red Heart with Love in Holly Berry and White
- I/5.5 mm crochet hook (I use Clover Amour)
- Yarn needle
- Scissors (I always keep these travel scissors in my hook case)
- Clover Large Pom Pom Maker
Abbreviations
- ch: chain
- sl st: slip stitch
- SC: single crochet
- HDC: half-double crochet
- HDV: half-double v-stitch (description below)
Special Stitch
HDV: HDC, ch 1, HDC in same stitch
Gauge
14 sts x 14 rows = 4" square in SC
Finished Size:
Width: 10.5"
Height (excluding pom pom): 11"
Pattern Notes
- The fair isle band is constructed in non-turning rows. This means you will cut and tie your yarn at the end of each row, and then start back at the beginning again with the next row.
- The length and overall "slouchiness" of this hat can be modified by adding or subtracting rows.
- For the fair isle portion of the pattern-yarn should be carried for the color changes (aka tapestry crochet)
Instructions
Fair Isle Band
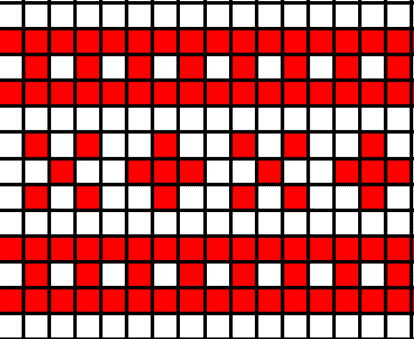
- Color A: Holly Berry/Color B: White
- The use of SC stitches throughout the band is implied. For pattern instructions I will note the color changes.
- The white row along the bottom of the hat will be added after the rest of the band is complete. The diameter of the hat can be adjusted by altering the overlap of the band (explained below). Adjust in increments of 3 sts.
ch 78, turn
Row 1: Using Color A, SC across (77). Cut and tie off
Row 2: (remember you are NOT turning your rows, but starting back at the beginning) *Color B, Color A, repeat from *across (alternating each color 1 stitch at a time). Cut and tie off
Row 3: Color A across, cut and tie off
Row 4: Color B across, cut and tie off
Row 5: *1 B, 1 A, 1 B, 1 A, 2 B, 1 A, 1 B, repeat from * 9 times, 1 B, 1 A, 1 B, 1 A, 1 B (77), cut and tie off
Row 6: *2 B, 1 A, 2 B, 3 A, repeat from * 9 times, 2 B, 1 A, 2 B (77), cut and tie off
Row 7: same as Row 5
Row 8: Color B across, cut and tie off
Row 9: Color A across, cut and tie off
Row 10: Same as Row 2
Row 11: Color A across, cut and tie off
Weave in your ends. Form your band into a circle that overlaps by 5 stitches (hold together with stitch markers or safety pins while you work). Attach Color B, ch 1 and SC around the hat, working through both layers where the band overlaps. When you finish you should have your first round (Round 1) of 72 sts. Sl st to the first SC of the round. Repeat this process along the bottom of the band. Ensure that your band is right side out, and attach desired buttons to make a mock closure.
You will now be working in rounds for the rest of the project.
Hat
Round 2: using Color A, attach yarn to Round 1 and ch 3 (counts as first HDC and ch stitch), HDC into same stitch. This forms your first HDV, skip 2, continue with HDV, skip 2 around. Attach to first HDC of the round with a sl st. (24 HDV sts)
Rounds 3-17: sl st into the first ch 1 space of the first HDV of the previous round. Ch 3 (counts as first HDC and ch stitch), HDC into the same space, HDV in the ch spaces of the previous round around. Attach to the first HDC with a sl st. (24 HDV sts)
Finishing
At the end of round 17, tie off leaving a 12" tail. Use a yarn needle to weave the tail back and forth the stitches in round 17 and pull to cinch the hat shut. Tie to secure. Create a large pom pom in Color B and attach it to the top of the hat. Weave in all ends.
More Free Crochet Patterns You'll Love


Find all FREE CROCHET PATTERNS here
Now the legal stuff...You may sell items made from this pattern, but please credit me as the original designer. Also, please do not share the written pattern in print or electronically. The photos on this webpage belong to Megan Meyer of Left in Knots and may not be used for product sales/product listings. You may share a link back to my blog if you would like someone else to see or work with this pattern. Thank you for your cooperation and if you have any questions please feel free to contact me!
This post contains affiliate links. Thank you for supporting free patterns and yarn deals from Left in Knots!