This crochet Car Seat Poncho works up quickly with super bulky yarn, and it will keep your toddlers warm and safe in their car seats this winter. Keep reading for the free crochet pattern.

A Crochet Car Seat Poncho Pattern for Your Toddlers
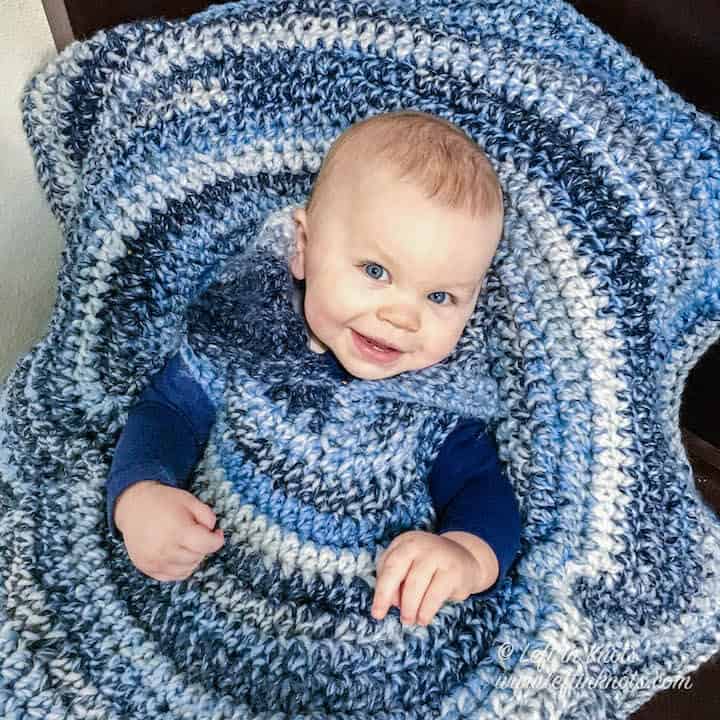
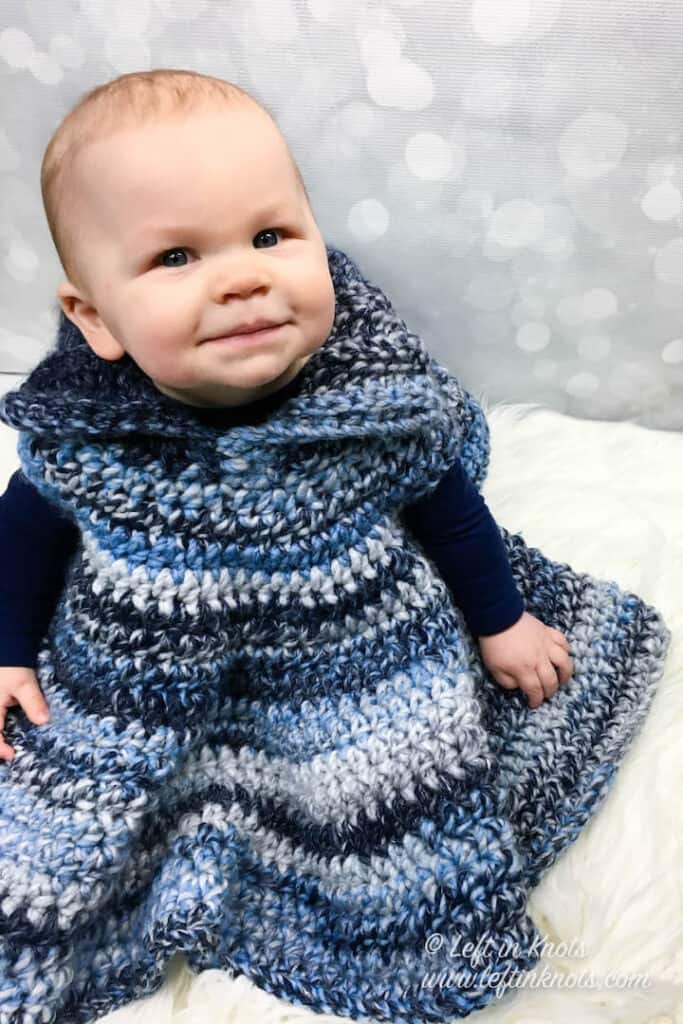
The bitter cold of winter is in full swing here, but that doesn’t mean we get to stay inside (at least not every day)! Alas, errands have to be run, preschool drop-off and pick-up need to happen, and my sweet baby boy gets toted along with me everywhere I go. I needed to have a way to keep him warm without putting him in a bulky jacket in his car seat when we go out, and that is the beauty of a car seat poncho! It fits over the straps so it can stay on regardless of of whether I’m buckling him in or unbuckling him to bring him with me out into the cold, and because it fits over the straps that means I can buckle him snuggly into his car seat without the bulk. I made my daughter something similar when she was a toddler, but I wanted to make my son his own. Since I am a crocheter I, of course, had to crochet it. And because I’m a designer I, of course, had to write up the pattern to share with you. Keep reading for the free crochet pattern. I hope you find it useful in these cold winter months!
Crochet To Keep Them Safe and Warm
I live in North Dakota where staying safe from the bitter cold is just as much of a consideration as staying safe by buckling snuggly in a car seat. If you live in a climate where you have very cold winters, I’m sure you understand. Children are not supposed to wear bulky jackets in their car seats because they can’t be buckled in tightly enough, but where I live you also can’t take them out completely unprepared for the cold either.
That’s where the beauty of the car seat poncho comes in. They get buckled into the car seat first, and then the poncho fits over them just like a blanket, but with arm holes so that they can still use their hands to eat those Cheerios that will inevitable fall all over the back seat. Then, when it’s time to get out of the car, you can unbuckle them without taking the poncho off. You can even tuck their little arms back inside and add a jacket underneath for the trip outside if necessary!
How I Use Our Car Seat Poncho
As I mentioned above, I live in North Dakota where layering in the winter is an absolute MUST! Here are the ways that I use our car seat poncho for my baby:
- If the car has been parked in our garage, I will leave it off of him for our drive, but them put it on him before I unbuckle him from his car seat. I’ll pull his little arms into the poncho while we are outside. If it is very cold I will add an extra jacket underneath the poncho after I take him out of his car seat. But I LOVE that he can still be covered and warm while I’m getting his jacket on him.
- If the car has been parked outside and gotten cold, I will take his coat off put leave the car seat poncho on him when I buckle him into the car seat. I push his arms through the arm holes so that he can use his hands to play with a toy while we drive, and he stays nice and warm while the car warms up. I don’t leave this on him when the car is already warm or for long drives. You know your child, use your best judgement.
- When we are shopping in a store, I also like to drape this over the shopping cart handle so that my ever-teething baby won’t chew on it - ha!
An Alternative to a Crochet Baby Blanket
As a crocheter - I love making and gifting crocheted baby blankets! In fact I already have a new baby blanket pattern made up that I will share with you this spring. However, as a mom of young children I can also say that I down right got too many blankets for my daughter (not so much my son since he was my second baby and I didn’t have a baby shower).
If you think mom and baby might be getting a lot of baby blankets but you still want to crochet a baby gift; consider crocheting a car seat poncho as a baby gift! I promise it will get used (if they live somewhere that gets cold in the winter) and really, isn’t that the best kind of gift to give and receive?!
Show off Your Crochet Projects
Don’t forget to share pictures of your projects with me in my Facebook Group or by tagging @leftinknots on Instagram. I can’t wait to see what you make!
Crochet Car Seat Poncho - Pattern
Supplies:
- Approx. 400 yards of a Category 6 yarn - Pictured is Loops and Threads Copenhagen in ‘Rainy Day’ from Michaels
- 10.0 mm crochet hook
- Scissors
- Yarn needle
- Stitch Markers (4) - here are some from one of my favorite Etsy sellers!
Abbreviations (written in U.S. terms):
- ch: chain
- sl st: slip stitch
- BLO: back loop only
- SC: single crochet
- HDC: half double crochet
Gauge
4 sts x 4 rows = 2” square in BLO SC
Finished Size:
Diameter when lying flat: 33.5”
Video Tutorials
How to Crochet SC Ribbing - the Right Handed video loads with the page
Find the left handed tutorial here
Pattern Notes
- The chain stitches at the beginning of each round do not count as a stitch.
- The last stitch of each round is attached to the first stitch of the round with a slip stitch.
- You can easily increase the size of this piece by adding rounds until it reaches your desired size.
- Do not leave this on a child for prolonged periods of time in the car or indoors. The car seat poncho should never cover any part of the baby’s face.
Instructions
Collar Ribbing - Working in Rows
ch 13
Row 1: SC in the second ch from the hook and SC across (12). Turn
Row 2-22: ch 1, working in BLO, SC across (12). Turn.
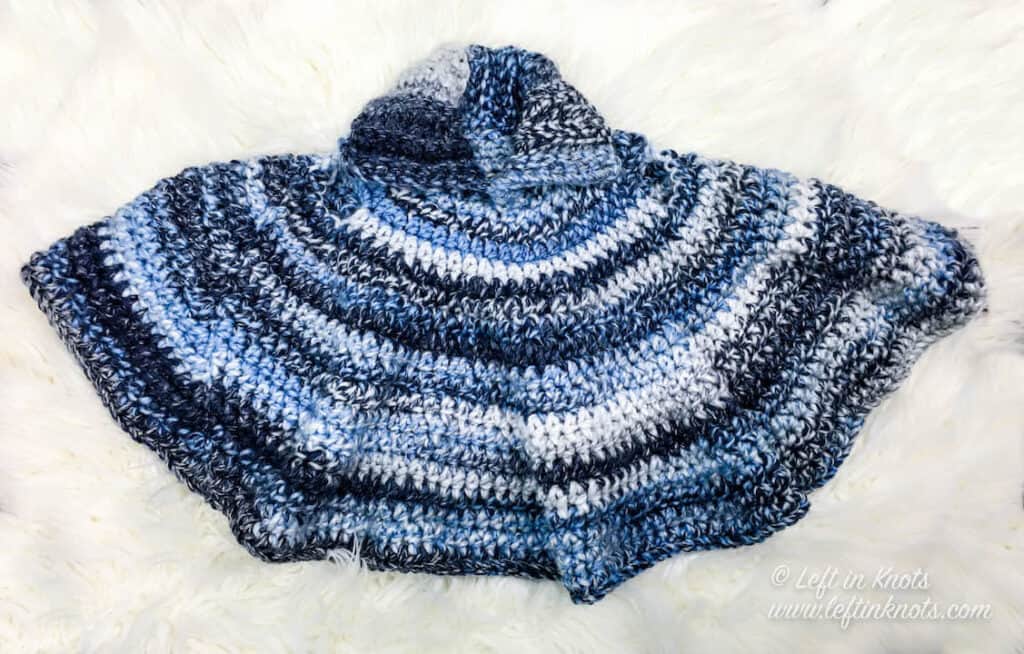
When you finish the ribbed band, fold it so that Row 1 and 22 are on top of one another. Working through the back loop of Row 22 and the front loop of Row 1, seam the first 3 stitches of each row together with sl sts. Tie off yarn. This is the FRONT of your collar (Figure 1)
*You will now be working in rounds. Attach your yarn with a sl st to the back side of the collar approximately in the center.*
Round 1: ch 1, SC around the raw edge of the collar working one stitch per row (22). Attach to first SC of the round with a sl st.
Round 2: ch 1, *2 HDC, HDC, repeat from * around (33). Attach to the first st of the round with a sl st.
Round 3: ch 1, *2 HDC, HDC in next 2 sts, repeat from * around (44). Attach to the first st of the round with a sl st.
Round 4: ch 1, *2 HDC, HDC in next 3 sts, repeat from * around (55). Attach to the first st of the round with a sl st.
Locate the center of your poncho (Figure 1). Using 4 stitch markers, mark the location where you would like your arm holes to be. I recommend that they should be either straight out to the side or slightly angled toward the front. I opted to make my arm holes 5 sts wide, but you can choose whatever width suits your needs. (Figure 2)
Round 5: ch 1, HDC in each st until you reach the location where you marked your arm hole, ch 5, skip 5, continue to HDC in each st until you reach the second arm hole, ch 5, skip 5, HDC in each st until you reach the end of your round. Attach to the first st of the round with a sl st. (55) Remove stitch markers.
Round 6: ch 1, *2 HDC, HDC in next 4 sts, repeat from * around (66). Work into the ch sts from the previous round like you would the others. Attach to the first st of the round with a sl st.
Round 7: ch 1, *2 HDC, HDC in next 5 sts, repeat from * around (77). Attach to the first st of the round with a sl st.
Round 8: ch 1, *2 HDC, HDC in next 6 sts, repeat from * around (88). Attach to the first st of the round with a sl st.
Round 9: ch 1, *2 HDC, HDC in next 7 sts, repeat from * around (99). Attach to the first st of the round with a sl st.
Round 10: ch 1, *2 HDC, HDC in next 8 sts, repeat from * around (110). Attach to the first st of the round with a sl st.
Round 11: ch 1, *2 HDC, HDC in next 9 sts, repeat from * around (121). Attach to the first st of the round with a sl st.
Round 12: ch 1, *2 HDC, HDC in next 10 sts, repeat from * around (132). Attach to the first st of the round with a sl st.
Round 13: ch 1, *2 HDC, HDC in next 11 sts, repeat from * around (143). Attach to the first st of the round with a sl st.
Round 14: ch 1, *2 HDC, HDC in next 12 sts, repeat from * around (154). Attach to the first st of the round with a sl st.
Round 15: ch 1, *2 HDC, HDC in next 13 sts, repeat from * around (165). Attach to the first st of the round with a sl st.
Round 16: ch 1, *2 HDC, HDC in next 14 sts, repeat from * around (176). Attach to the first st of the round with a sl st.
Round 17: ch 1, *2 HDC, HDC in next 15 sts, repeat from * around (187). Attach to the first st of the round with a sl st.
Round 18: ch 1, *2 HDC, HDC in next 16 sts, repeat from * around (198). Attach to the first st of the round with a sl st.
Round 19: ch 1, *2 HDC, HDC in next 17 sts, repeat from * around (209). Attach to the first st of the round with a sl st.
This is where my sample project ended. Feel free to continue to make this larger if desired. Tie off yarn and weave in all ends.
Keep up with all new releases in my Facebook community group or on Instagram! Or just stop by to share pictures of your completed projects. I love seeing your work!
More Free Crochet Patterns You'll Love
Find all FREE CROCHET PATTERNS here
Now the legal stuff...You may sell items made from this pattern, but please credit me as the original designer. Also, please do not share the written pattern in print or electronically. The photos on this webpage belong to Megan Meyer of Left in Knots and may not be used for product sales/product listings. You may share a link back to my blog if you would like someone else to see or work with this pattern. Thank you for your cooperation and if you have any questions please feel free to contact me!
This post contains affiliate links. Thank you for supporting free patterns and yarn deals from Left in Knots!