Crochet the Amelia Poncho Sweater with just one skein of Caron Cakes yarn! This easy pattern has a simple construction and a video tutorial to help you along. Keep reading for the free crochet pattern.
Crochet a Modern, One Skein Toddler Poncho
Caron Cakes yarn-I feel like it is all I have seen talked about in the internet crochet world for the last week! How did I have no idea this yarn was going to be released? When I saw the colors, I knew I had to try it and I am SO glad that I did! It is such a soft and light wool/acrylic blend making it a dream to work with. Can you believe this free poncho pattern uses just one skein!?

Use Solid or Self-Striping Yarn
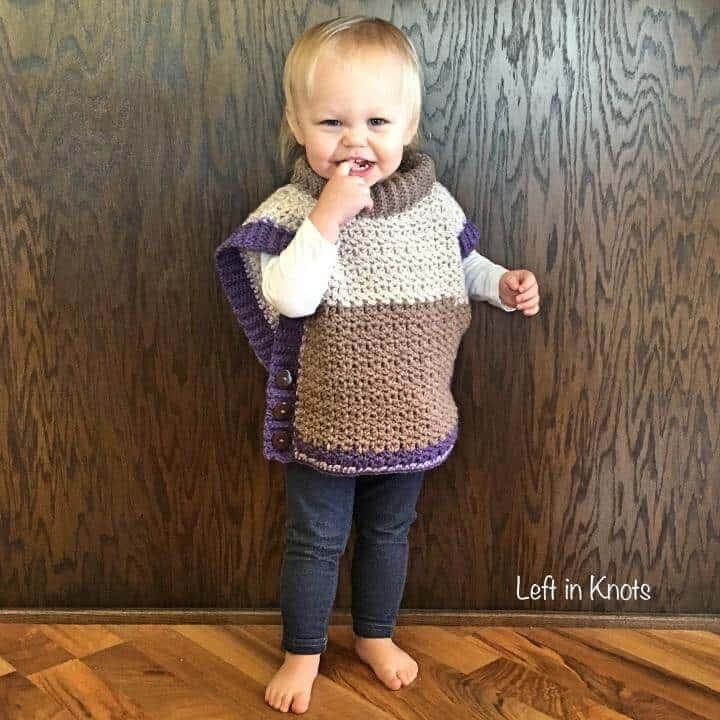
I'm so glad that my daughter modeled nicely because this Amelia Poncho Sweater looks so cute on. And because the yarn is so light and soft, it will keep her warm in the coming fall temperatures without being too heavy or bulky. Caron Cakes yarn is self-striping, so you may not get the same exact look as I did, but that's the fun of using a self striping yarn-you never know exactly where the color changes will happen! This pattern would also work well with any worsted weight yarn if you prefer solid colors.
The ribbed edge on the sides and neck of this poncho give it a mock knit appearance, while keeping the crocheted look for the majority of the fabric of half-double V stitches. If you know how to single crochet and half-double crochet, you can make this! The buttons provide fashion and function, holding the sides together to make oversized arm holes. I found this to help it stay on much better than if the sides we separated! My daughter is currently wearing 24 month clothing, and I think this would easily fit 24 month/2T-3T. There is definitely some wiggle room since it is a loose fitting piece, and it is always a plus when you can get more than one season's use out of clothing (handmade or otherwise!). I hope you enjoy this pattern as much as I enjoyed making it!
Show off Your Crochet Projects
Don’t forget to share pictures of your projects with me in my Facebook Group or by tagging @leftinknots on Instagram. I can’t wait to see what you make!
Supplies
- Caron Cakes Yarn (I used Lilac Frosting): I used almost exactly 1 skein (just a little left over)
- J/6.0 Crochet Hook (I used Clover Amour)
- 6- 3/4” buttons
- Yarn needle
- Scissors
Abbreviations (US Terms)
- St: stitch
- Sl st: slip stitch
- Ch: Chain
- SC: Single crochet
- HDC: Half double crochet
- HDV: Half Double V stitch
- BLO: back loop only
Special Stitch
HDV: HDC, Ch 1, HDC all in the same stitch
Gauge:
4” square = 15 sts x 9 rows
Pattern Notes:
- Ch stitches at the beginning of rows do not count as a stitch
- This pattern is written to fit size 24 mo./2T-3T, but can easily be adjusted to be smaller or larger
Instructions
Ch 54
Row 1: In third ch from hook, HDV, *skip 2, HDV, repeat from * across (18 HDV sts)
Row 2-32: Ch 2, HDV in the ch space and in all the ch spaces across (18 HDV sts)
Row 33: Ch 2, HDV in next 5 ch spaces, Ch 24, skip 8 ch spaces, HDV in last 5 ch spaces
Row 34: Ch 2, HDV across, working 8 HDV sts into the chain stitches (you will have to go into a ch stitch, not just the space) (18 HDV sts)
Row 35-65: Ch 2, HDV across (18 HDV sts)
When you reach the end of the last row, ch 1 and SC around the entire piece until you come back to the corner where you started. This creates the SC edging.
To create the ribbed edging (on the long sides of the poncho):
Ch 7, SC in second ch from the hook, *sl st to the SC stitch of your edging, sl st into the next st, ch 1, BLO SC across, ch 1 and turn, BLO SC across, repeat from * until you finish that side of the poncho.
SC across the short edge of the poncho (Row 1 or 65), repeat the ribbing when you get to the next corner, SC across the second short edge (Row 1 or 65). Join to the ribbing with a sl st and tie off.
To create the neck:
The ch sts in Row 33 created a head hole in the middle of the poncho. SC around this hole once. Join to your first SC with sl st. Ch 11, and repeat the ribbing process described for the ribbed edging (but with 10 SC instead of 6). When you finish the entire neck, seam the ends together by working sl sts through your first and last rows of ribbing.
Adding buttons:
The buttons on this are optional, but I like that it keeps the poncho together! It makes it harder for my daughter to pull off 🙂 I selected 6 buttons and evenly spaced them in the bottom third of the poncho. Using a yarn needle, sew through BOTH layers of the poncho. You could also work through just the front layer of the poncho if you want the front and back to be loose.
More Free Crochet Patterns You'll Love
Find all FREE CROCHET PATTERNS here
Now the legal stuff...You may sell items made from this pattern, but please credit me as the original designer. Also, please do not share the written pattern in print or electronically. The photos on this webpage belong to Megan Meyer of Left in Knots and may not be used for product sales/product listings. You may share a link back to my blog if you would like someone else to see or work with this pattern. Thank you for your cooperation and if you have any questions please feel free to contact me!
This post contains affiliate links. Thank you for supporting free patterns and yarn deals from Left in Knots!