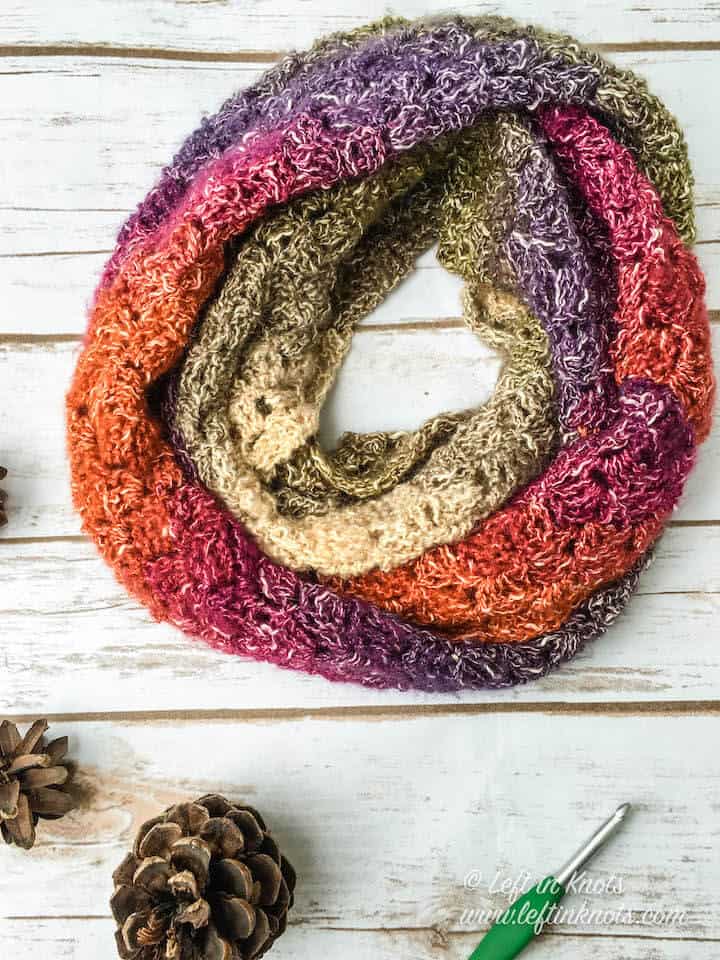
This crochet C2C infinity scarf is made with just one skein of Lion Brand Shawl in a Ball. The c2c stitch combined with this yarn makes a beautiful, light weight scarf perfect for cooler temperatures. Keep reading for the Eventide Infinity Scarf free crochet pattern.
Use the C2C stitch to made an Infinity Scarf
Have you ever worked with Shawl in a Ball/Cake before? It is a beautiful yarn, but it can be a bit tricky to work with. It’s textured with quite a lot of fluff, and its not always easy to see your stitches. But the beauty of the C2C stitch is that you don’t really need to work in many traditional stitch spaces at all! That makes even the most complicated yarns pretty darn easy to crochet with. Plus it created this awesome diagonal color fade which I am totally digging. And the cherry on top? It’s a one skein project - my favorite kind!

Show off Your Crochet Projects
Don’t forget to share pictures of your projects with me in my Facebook Group or by tagging @leftinknots on Instagram. I can’t wait to see what you make!
Eventide Infinity Scarf - Free C2C Crochet Pattern
Supplies:
- Lion Brand Yarn Shawl in a Ball or Shawl in a Cake (‘Calming Desert’ pictured) or 481 yards of a comparable yarn
- I/5.5mm Crochet Hook (I use Clover Amour)
- Scissors - I always keep these travel scissors in my hook case
- Yarn needle
Abbreviations (written in U.S. terms):
- ch: chain
- sl st: slip stitch
- DC: double crochet
Gauge
6 squares x 6 squares = 4”
Finished Size:
- Width: 10"
- Length (when joined): 22"
Pattern Notes
- This pattern is a classic C2C scarf using DC. If you are familiar with the technique, you may not need to read through all the stitch descriptions exactly.
- You can easily adjust the width and length of this scarf to your desired size. To increase or decrease the width, add or remove extra rows between Row 4-17. To increase or decrease the length, add or remove extra rows between Rows 20-60.
- ch sts do not count as a stitch
Instructions
Row 1: ch 5, DC in third ch from the hook and in the next two ch sts. This makes your first "pixel" square. (1 square) Turn.
Row 2: ch 5, DC in third ch from the hook and in the next two ch sts, sl st into the next ch 2 space from the previous row, ch 2 and work 3 DC into the ch 2 space of the previous row. (2 squares) Turn.
Row 3: ch 5, DC in third ch from the hook and in the next two ch sts, *sl st into the next ch 2 space from the previous row, ch 2 and work 3 DC into the ch 2 space of the previous row. Repeat from * across until you have worked 3 DC into each ch 2 space from the previous row. (3 squares) Turn.
Row 4-17: repeat Row 3; each row will increase by one square (e.g. Row 4 = 4 squares, Row 5 = 5 squares, etc.)
Row 18: ch 5, DC in third ch from the hook and in the next two ch sts, *sl st into the next ch 2 space from the previous row, ch 2 and work 3 DC into the ch 2 space of the previous row. Repeat from * until you reach the last ch 2 space. Sl st into the last ch 2 space. Turn. Sl st across the last 3 DC sts from the row you just completed (17 squares)
Row 19: ch 2, work 3 DC into the ch 2 sp from the previous row, *sl st into the next ch 2 space from the previous row, ch 2 and work 3 DC into the ch 2 space of the previous row. Repeat from * across until you have worked 3 DC into each ch 2 space from the previous row. (17 squares)
Row 20 - 60: Repeat Row 18 (on even rows) and Row 19 (on odd rows)
Row 61: ch 2, work 3 DC into the ch 2 sp from the previous row, *sl st into the next ch 2 space from the previous row, ch 2 and work 3 DC into the ch 2 space of the previous row. Repeat from * across until you reach the last ch 2 space. Sl st into the last ch 2 space. Turn. Sl st across the last 3 DC sts from the row you just completed (16 squares)
Row 62-76: repeat Row 61; each row will decrease by one square (e.g. Row 62 = 15 squares, Row 63 = 14 squares, etc.)
When you reach the end of Row 76, tie off your yarn leaving a long (18”) tail. Use this tail and a yarn needle to sew each end of the scarf together to make an infinity scarf.
More Free Crochet Patterns You'll Love


Find all FREE CROCHET PATTERNS here
Now the legal stuff...You may sell items made from this pattern, but please credit me as the original designer. Also, please do not share the written pattern in print or electronically. The photos on this webpage belong to Megan Meyer of Left in Knots and may not be used for product sales/product listings. You may share a link back to my blog if you would like someone else to see or work with this pattern. Thank you for your cooperation and if you have any questions please feel free to contact me!
This post contains affiliate links. I receive a small commission for any purchases made through these links at no additional charge to you.