How to Crochet a Car Seat Cloak (Car Seat Poncho)
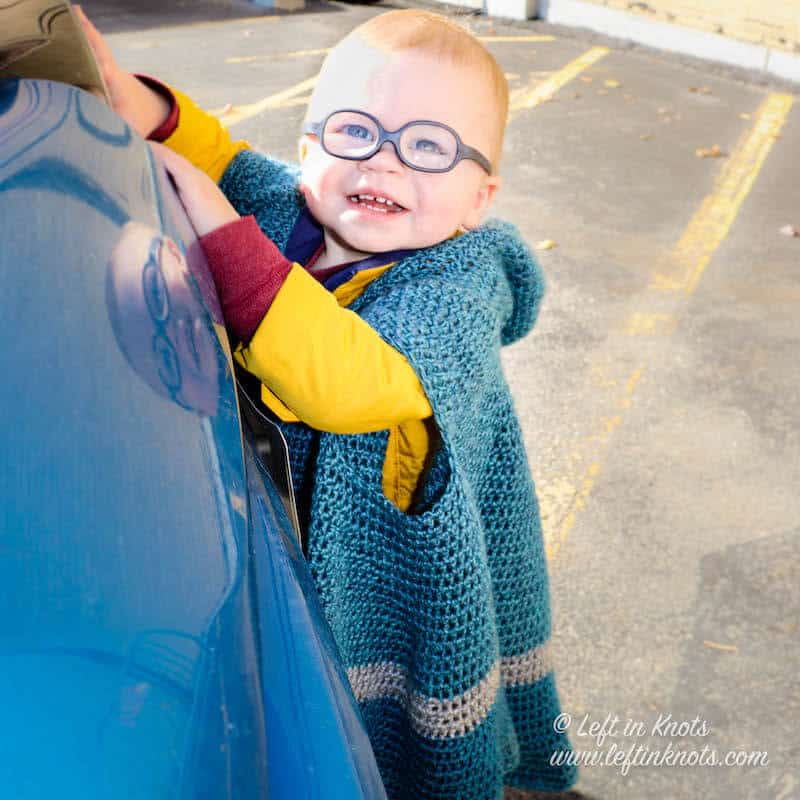
A car seat cloak is a life and sanity saver when you are raising a toddler in a cold winter climate! This functional design fits safely over the car seat straps and acts as a blanket while in the car, and as an extra layer of warmth once you are out of the vehicle. The Car Seat Cloak has been one of my most popular free crochet patterns and it has now been updated to include a video tutorial to help you with the simple construction.

So let's talk about toddlers in the winter time... It's HARD! In retrospect, winter infants aren't terribly difficult. You strap them into their car seat, cover them with blankets, add a car seat cover and you are ready to brave even the coldest weather.
Toddlers are an entirely different story! Toddlers, for one, move....a LOT! They also can't generally ride in the infant car seats that pop right out of your vehicle for safe and warm transport into the nearest heated building. Nope! They are forced to walk (hop, run, drag their feet, etc.) through the cold until they reach the blissful warmth that is Target or perhaps a yarn store...

A Car Seat Cloak Pattern for Winter Safety
Where I live, we reach winter temps of down to -40 wind chills. That is CRAZY cold! But due to (very legitimate) car seat safety guidelines, children are not supposed to wear bulky jackets while strapped into their car seats. Enter the brilliance of the car seat cloak!
This article of clothing has gotten popular over the past few years because of car seat recommendations. So I definitely can't take credit for the general concept. But like all good crocheters, when I saw a product I could easily purchase I thought "hey, I could spend several hours making that instead!" 😉
I designed this pattern to be warm, washable, and practical. While in the car, arms can be placed through the small arm holes so that your child has use of their hands (because how else would they spill goldfish crackers all over the back seat?). Then, when you get to where you are going, you can slip their arms back into the cloak, free them from their car seat, and the cloak then stays on as an extra layer of warmth outside. I usually layer a warm but lightweight jacket underneath to make sure that my daughter stays warm enough in the cold weather!
Show off Your Crochet Projects
Don’t forget to share pictures of your projects with me in my Facebook Group or by tagging @leftinknots on Instagram. I can’t wait to see what you make!
Supplies
- Approx. 1,200 yards of a Category 4 (worsted weight) yarn. The samples pictured at made using Vanna’s Choice yarn and Lion Brand Heartland yarn.
- H/5.0mm crochet hook (I use Clover Amour)
- Yarn needle
- Scissors (I always keep these travel scissors in my hook case)
Abbreviations (U.S. Terms)
- ch: chain
- sl st: slip stitch
- SC: single crochet
- HDC: half-double crochet
- RSC: reverse single crochet (aka 'crab stitch')
Finished Size:
Diameter (when laid flat as a circle) = 36"
Shoulder to bottom = approx. 14"
Gauge:
14 sts x 10 rows = 4" square in HDC
Video Tutorial:
You can find the Left Handed version of this tutorial on YouTube HERE
Pattern Notes:
- Chain stitches at the beginning of rounds or rows do not count as a stitch.
- The last st of the round should be attached to the first st of the round with a sl st.
- This pattern can easily be made shorter or longer by adding or subtracting rounds in the cloak portion of the pattern. The hood is written in two sizes, but the cloak size is the same for either hood size.
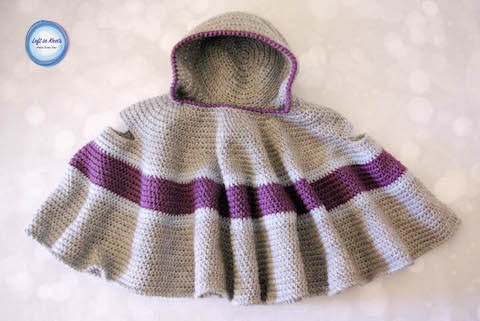
- The color changes indicated in the pattern below follow the stripe pattern of the Grey/Purple cloak sample pictured.
Crochet Car Seat Cloak - Pattern Instructions:
Hood (Small)
Start with a magic circle (video tutorial HERE)
Round 1: ch 2, 10 HDC in magic circle. Pull tight
Round 2: ch 2, 2 HDC in each stitch around (20)
Round 3: ch 2, *2 HDC, HDC in next st, repeat from * around (30)
Round 4: ch 2, *2 HDC, HDC in next 2 sts, repeat from * around (40)
Round 5: ch 2, *2 HDC, HDC in next 3 sts, repeat from * around (50)
Round 6: ch 2, *2 HDC, HDC in next 4 sts, repeat from * around (60)
Round 7-9: ch 2, HDC around (60)
*You will now start working in rows*
Row 10-12: ch 2, HDC in 56, turn (56)
Row 13: ch 2, 2 HDC in first st, HDC in next 54, 2 HDC in last stitch, turn (58)
Row 14: ch 2, HDC across, turn (58)
Row 15: ch 2, 2 HDC in first st, HDC in next 56, 2 HDC in last stitch, turn (60)
Row 16-19: ch 2, HDC across, turn (60)
Row 20: ch 1, *HDC2Tog, HDC in next 8 sts, repeat from * across (54)
Row 21-22: ch 1, SC across (54)
ch 1 and SC 48 around the neck part of the hood. Continue to ch 22 for a total of 70 sts around for a head hole. sl st into the first st of the head hole. Do not tie off. Continue directly on to ‘cloak’ instructions. Do NOT turn your work.
Hood - Large
Start with a magic circle (video tutorial HERE)
Round 1: ch 2, 11 HDC in magic circle. Pull tight
Round 2: ch 2, 2 HDC in each stitch around (22)
Round 3: ch 2, *2 HDC, HDC in next st, repeat from * around (33)
Round 4: ch 2, *2 HDC, HDC in next 2 sts, repeat from * around (44)
Round 5: ch 2, *2 HDC, HDC in next 3 sts, repeat from * around (55)
Round 6: ch 2, *2 HDC, HDC in next 4 sts, repeat from * around (66)
Round 7-9: ch 2, HDC around (66)
*You will now start working in rows*
Row 10-12: ch 2, HDC in 62, turn (62)
Row 13: ch 2, 2 HDC in first st, HDC in next 60, 2 HDC in last stitch, turn (64)
Row 14: ch 2, HDC across, turn (64)
Row 15: ch 2, 2 HDC in first st, HDC in next 62, 2 HDC in last stitch, turn (66)
Row 16-19: ch 2, HDC across, turn (66)
Row 20: ch 1, *SC in 4 sts, SC2Tog, repeat from * across (55)
Row 21-22: ch 1, SC across (55)
ch 1 and SC 48 around the neck part of the hood. Continue to ch 22 for a total of 70 sts around for a head hole. sl st into the first st of the head hole. Do not tie off. Continue directly on to ‘cloak’ instructions. Do NOT turn your work.
Cloak
Round 1: ch 2, HDC around (70)
Round 2: ch 2, *2 HDC, HDC, repeat from * around (105)
Round 3: ch 2, *2 HDC, HDC in 4, repeat from * around (126)
Round 4: ch 2, *2 HDC, HDC in 8, repeat from * around (140)
Round 5: ch 2, *2 HDC, HDC in 13, repeat from * around (150)
Round 6: ch 2, *2 HDC, HDC in 14, repeat from * around (160)
Round 7: ch 2, *2 HDC, HDC in 15, repeat from * around (170)
Round 8: ch 2, *2 HDC, HDC in 16, repeat from * around (180)
Round 9: ch 2, *2 HDC, HDC in 17, repeat from * around (190)
Round 10: ch 2, *2 HDC, HDC in 18, repeat from * around (200)
Round 11: ch 2, 2 HDC, HDC in 19, 2 HDC, HDC in 3, ch 15, sk 15, HDC, *2 HDC, HDC in 19, repeat from * 3 more times, 2 HDC, HDC in 3, ch 15, skip 15, HDC, *2 HDC, HDC in 19, repeat from * 2 more times (210)
Round 12: ch 2, *2 HDC, HDC in 20, repeat from * around (220)
Round 13: ch 2, *2 HDC, HDC in 21, repeat from * around (230)
Round 14 (blue): ch 2, *2 HDC, HDC in 22, repeat from * around (240)
Round 15 (blue): ch 2, *2 HDC, HDC in 23, repeat from * around (250)
Round 16 (purple): ch 2, *2 HDC, HDC in 24, repeat from * around (260)
Round 17 (purple): ch 2, *2 HDC, HDC in 25, repeat from * around (270)
Round 18 (purple): ch 2, *2 HDC, HDC in 26, repeat from * around (280)
Round 19 (purple): ch 2, *2 HDC, HDC in 27, repeat from * around (290)
Round 20 (purple): ch 2, *2 HDC, HDC in 28, repeat from * around (300)
Round 21 (purple): ch 2, *2 HDC, HDC in 29, repeat from * around (310)
Round 22 (blue): ch 2, *2 HDC, HDC in 30, repeat from * around (320)
Round 23 (blue): ch 2, *2 HDC, HDC in 31, repeat from * around (330)
Round 24: ch 2, *2 HDC, HDC in 32, repeat from * around (340)
Round 25: ch 2, *2 HDC, HDC in 33, repeat from * around (350)
Round 26: ch 2, *2 HDC, HDC in 34, repeat from * around (360)
Round 27: ch 2, *2 HDC, HDC in 35, repeat from * around (370)
Round 28: ch 2, *2 HDC, HDC in 36, repeat from * around (380)
Round 29: ch 2, *2 HDC, HDC in 37, repeat from * around (390)
Round 30: ch 2, *2 HDC, HDC in 38, repeat from * around (400)
Round 31: ch 2, *2 HDC, HDC in 39, repeat from * around (410)
Round 32: ch 2, *2 HDC, HDC in 40, repeat from * around (420)
Round 33: ch 2, *2 HDC, HDC in 41, repeat from * around (430)
Round 34: ch 2, *2 HDC, HDC in 42, repeat from * around (440)
Round 35: ch 2, *2 HDC, HDC in 43, repeat from * around (450)
Round 36: ch 2, *2 HDC, HDC in 44, repeat from * around (460)
Round 37: ch 1, RSC around the bottom edge of the poncho (460)
Tie off and weave in ends.
With the color 'Dusty Purple', sl st into any stitch along the hood. Ch 1 and RSC around until you end up where you started. Tie off and weave in ends.
More Free Crochet Patterns You'll Love
Find all FREE CROCHET PATTERNS here
Now the legal stuff...You may sell items made from this pattern, but please credit me as the original designer. Also, please do not share the written pattern in print or electronically. The photos on this webpage belong to Megan Meyer of Left in Knots and may not be used for product sales/product listings. You may share a link back to my blog if you would like someone else to see or work with this pattern. Thank you for your cooperation and if you have any questions please feel free to contact me!
This post contains affiliate links. Thank you for supporting free patterns and yarn deals from Left in Knots!