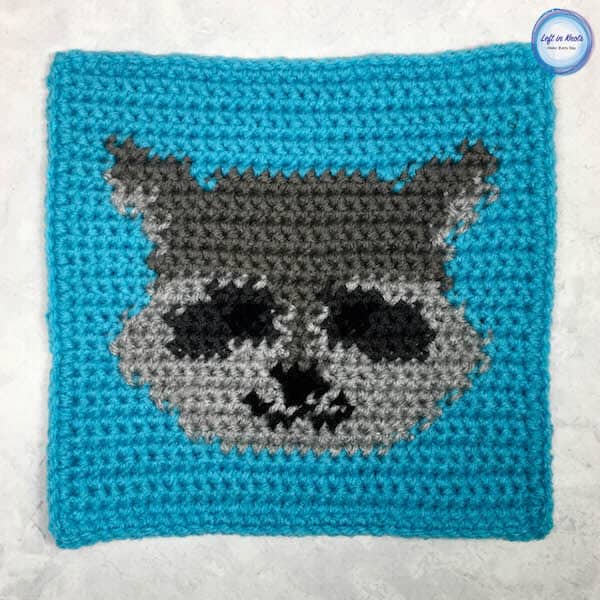
Grids for Kids is back with a woodland animal theme this week! Grids for Kids - Forest Friends is a free crochet pattern that will show you how to turn simple pixel graphs into an adorable plush block. These make wonderful baby toys and could also be used as blanket squares. Each day this week I will release a new square pattern with written color changes. At the end of the week I will show you my finished block and assembly instructions. Below you will find the free written pattern for my raccoon square - complete with written color changes!
Last year around this time I was wrapping up my original Grids for Kids crochet blocks. I made one matching animal for each letter of the alphabet, and joined them into giant pillow blocks for my daughter. The first time around I used the methods of cross-stitching on SC squares, and I still love that technique but it does take a while! So this time I decided to try tapestry crochet instead and I can honestly say that I love the results of each in their own way!
Now of course you don't have to make these squares into blocks - you could also make them into an afghan, but for what it's worth the blocks have become my two year old daughter's favorite toy! She can toss them, stack them, build caves with them, and every once in a while I find that she has snuck one in bed with her after I leave the room at night. Ha!
The raccoon is square number three of my Grids for Kids Forest Friends block, and I will be back tomorrow with another. You can find many more animals and letters in my other Grids for Kids posts! They are all the same size, so mix and match as you wish!
See the Fox Square (square #1) HERE
See the Bear Square (square #2) HERE
Supplies:
- Red Heart Super Saver Yarn and Red Heart with Love (I used Turqua, Light Grey, Pewter (With Love), Charcoal, and Black...less than 100 yards of each is PLENTY. This project is a great scrap buster)
- H/5.0mm crochet hook (I use Clover Amour)
- Scissors (I always keep these travel scissors in my hook case)
- Yarn needle
Abbreviations (this pattern is written in U.S. terms):
- st/sts: stitch/stitches
- sl st: slip stitch
- ch: chain
- SC: single crochet
Gauge
17 sts x 17 rows = 4" square
Gauge is not particularly important for this project as long as you use a fairly tight and even tension
Finished Size:
approx. 8" x 8" square
Pattern Notes
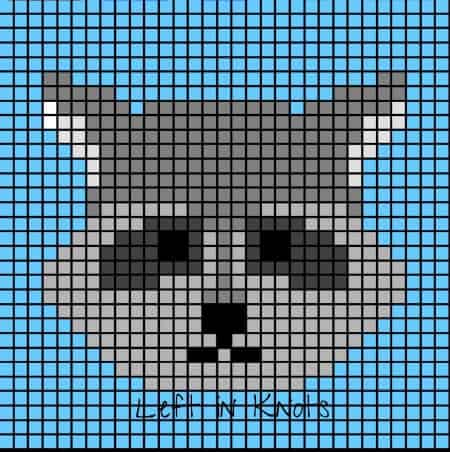
- This pattern can also be made using the technique of cross stitch on crochet. Find instructions for that here by watching my video tutorial
- This image is symmetrical, so all of the color changes should work out the same whether you are right or left handed
- ch sts do not count as a st
- The entire square is constructed in SC, so the written pattern will indicate color changes
- Feel free to follow the pixel graph or the written pattern. If you follow the written pattern I recommend following along on the pixel graph as well just to double check!
- Color A: Turqua, Color B: Light Grey, Color C: Pewter, Color D: Charcoal, Color E: Black
Instructions
ch 32
Row 1 (Color A): SC in second ch from the hook and SC across (all rows here on out will have 31 sts)
Rows 2-4: A across
Row 5: 10 A, 11 B, 10 A
Row 6: 8 A, 15 B, 8 A
Row 7: 7 A, 6 B, 2 E, 1 B, 2 E, 6 B, 7 A
Row 8: 6 A, 6 B, 1 E, 2 B, 1 E, 2 B, 1 E, 6 B, 6 A
Row 9: 5 A, 9 B, 3 E, 9 B, 5 A
Row 10: 4 A, 10 B, 3 E, 10 B, 4 A
Row 11: 3 A, 11 B, 3 C, 11 B, 3 A
Row 12: 3 A, 4 B, 4 D, 4 B, 1 C, 4 B, 4 D, 4 B, 3 A
Row 13: 3 A, 4 B, 7 D, 1 B, 1 C, 1 B, 7 D, 4 B, 3 A
Row 14: 4 A, 3 B, 4 D, 2 E, 1 D, 1 B, 1 C, 1 B, 1 D, 2 E, 4 D, 3 B, 4 A
Row 15: 5 A, 3 B, 3 D, 2 E, 1 D, 1 B, 1 C, 1 B, 1 D, 2 E, 3 D, 3 B, 5 A
Row 16: 6 A, 4 B, 4 D, 3 C, 4 D, 4 B, 6 A
Row 17: 6 A, 1 C, 6 B, 5 C, 6 B, 1 C, 6 A
Row 18: 6 A, 19 C, 6 A
Row 19-20: 6 A, 1 B, 17 C, 1 B, 6 A
Row 21: 5 A, 2 B, 17 C, 2 B, 5 A
Row 22: 4 A, 2 B, 19 C, 2 B, 4 A
Row 23: 3 A, 3 B, 19 C, 3 B, 3 A
Row 24: 3 A, 1 B, 5 C, 1 A, 11 C, 1 A, 5 C, 1 B, 3 A
Row 25: 3 A, 5 C, 15 A, 5 C, 3 A
Row 26: 3 A, 2 C, 21 A, 2 C, 3 A
Row 27-31: A across
When you get to the end of the last row, ch 1 and SC around the outside of your square working 31 stitches along each side and chaining 1 at each corner. Sl st into the first stitch of your edging and tie off your yarn.
Now take a look at all those ends and don't freak out! If you are making a block you don't have to weave in any of them. Hooray! Stick with me the rest of the week to see the rest of the Forest Friends square patterns. To see how I join my block squares you can check out my video tutorial here.
Now the legal stuff...You may sell items made from this pattern, but please credit me as the original designer. Also, please do not share the written pattern in print or electronically. The photos on this webpage belong to Megan Meyer of Left in Knots and may not be used for product sales/product listings. You may share a link back to my blog if you would like someone else to see or work with this pattern. Thank you for your cooperation and if you have any questions please feel free to contact me!
This post contains affiliate links. Thank you for supporting free patterns and yarn deals from Left in Knots!