Make a soft, sensory crochet fish bowl toy with this free pattern. Babies and toddlers will love playing with this fun stuff and spill toy. Keep reading for the free crochet pattern.
Crochet Fish Bowl Toy for Babies and Toddlers
I had the idea for this crochet fish bowl a few weeks ago, but it got pushed to the back burner while I was finishing up other projects. Now I am so excited to share it with you! If you can't tell by now, I am REALLY enjoying my Bernat Blanket Brights yarn, and I am so glad that I finally caved and bought some. With a little imagination, I am finding it to be very versatile.
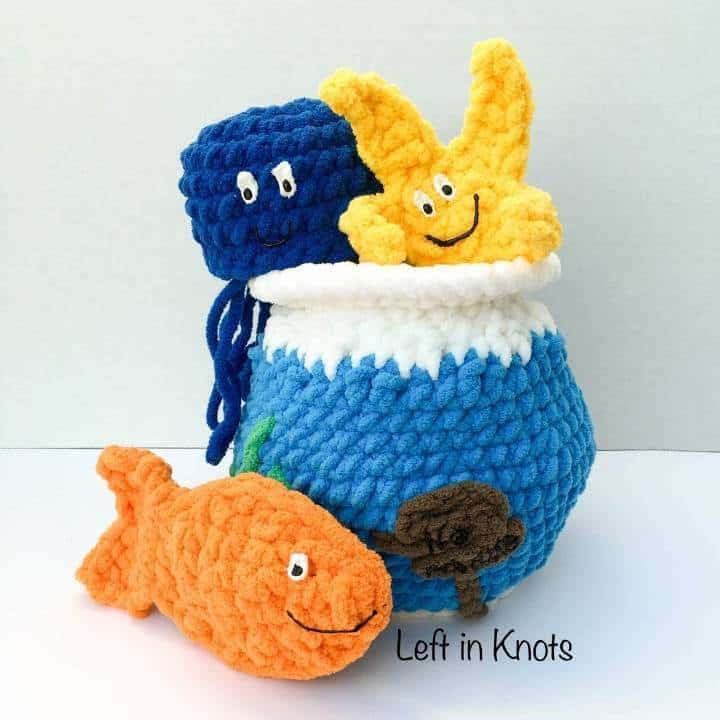
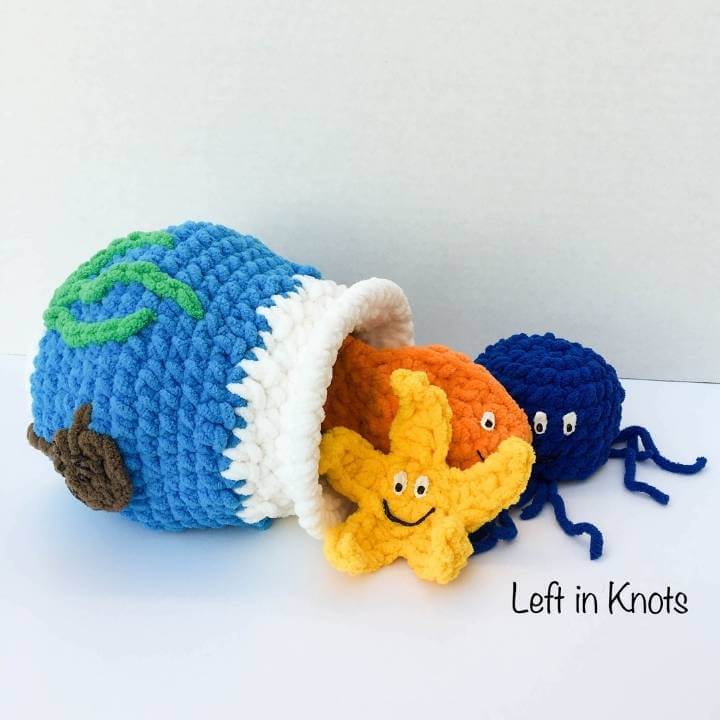
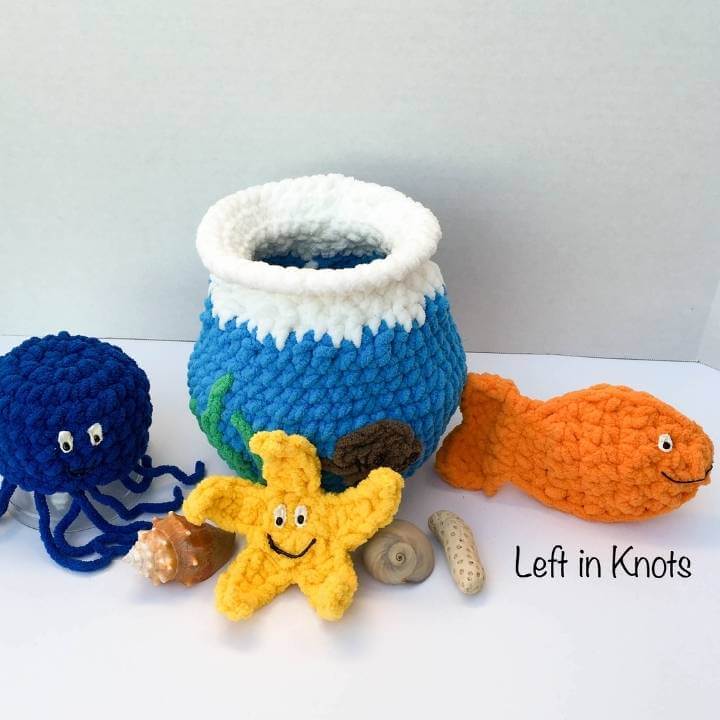
This project is an adorable, plushy toy that is perfect for babies and toddlers! Featuring a large fish bowl, fish, starfish, and jellyfish-babies will have fun pulling these surprises out of the bowl and stuffing them back in again. It has been hard to keep these happy fish away from my daughter while I have been working on this! The decor on the outside of the bowl is optional and customizable. I thought a 'No Fishing' sign was pretty funny; additionally it would look good with more plants or even little fish on the outside as well!
Show off Your Crochet Projects
Don’t forget to share pictures of your projects with me in my Facebook Group or by tagging @leftinknots on Instagram. I can’t wait to see what you make!
Crochet Fish Bowl Baby Toy - Instructions
Supplies
- Bernat Blanket Yarn in Busy Blue, Go Go Green, School Bus Yellow, Royal Blue, Carrot, White, and Taupe
- 9.0mm crochet hook (I used Clover Amour)
- Non-toxic puffy paint in Black and White
- Yarn Needle
- Scissors
Abbreviations
- St: stitch
- Sl st: slip stitch
- Ch: Chain
- SC: Single crochet
- SC2TOG: Single crochet two together
- RSC: Reverse single crochet (aka crab stitch)
- HDC: Half double crochet
- DC: Double crochet
- FLO: front loop only
- BLO: back loop only
Pattern Notes:
- Ch stitches at the beginning or rounds or rows do not count as a stitch
- The end of each round is joined with a sl st to the first stitch of the round
- Gauge is not important for the finished product. My fish bowl is about 10 inches tall
- I opted to use non-toxic puffy paint as opposed to safety eyes to make these truly baby friendly
Fish Bowl:
Start with Magic Circle (with color ‘Busy Blue’).
Round 1: Ch 1, work 10 DC into magic circle. Pull tight
Round 2: Ch 1, 2 DC in each st around (20)
Round 3: Ch 1, *2 DC, SC in next st, repeat from *around (30)
Round 4 (BLO): Ch 2, *2 SC, SC in next 2, repeat from *around (40)
Round 5-7: Ch 1, SC around (40)
Round 8: Ch 1, *2 SC, SC in next 3, repeat from *around (50)
Round 9-11: Ch 1, SC around (50)
Round 12: Ch 1, *SC2TOG, SC in next 3, repeat from *around (40)
Round 13-14: Ch 1, SC around (40)
Round 15: Ch 2, *DC in 2, SC in 2, repeat from *around (40)
*Switch to color ‘White’*
Round 16: Ch 1, *SC in 2, DC in 2, repeat from *around (40)
Round 17: Ch 1, SC2TOG around (20)
Round 18: Ch 1, 2 SC in each st around (40)
Round 19: Ch 1, SC around (40)
Round 20: Ch 1, RSC around (40). Join with sl st to first st of the round and tie off.
Finishing:
Working in the FL of round 3, attach white yarn and SC around to make the base of the bowl. Using Go Go Green, Sl st on the surface of the bowl to make plants.
Using Taupe, Sl St on the surface of the bowl to make ‘No Fishing’ Sign. Use non-toxic puffy paint to write 'No Fishing'
Fish (in color ‘Carrot’):
Ch 4
Row 1: SC in second ch from hook and SC across (3)
Row 2: Ch 1, 2 SC, SC, 2 SC (5)
Row 3: Ch 1, SC across (5)
Row 4: Ch 1, 2 SC, SC in next 3, 2 SC (7)
Row 5: Ch 1, SC across (7)
Row 6: Ch 1, SC2TOG, SC in next 3, SC2TOG (5)
Row 7: Ch 1, SC across (5)
Row 8: Ch 1, SC2TOG, SC, SC2TOG (3)
Row 9: Ch 1, SC across (3)
Row 10: Ch 1, SC3TOG (1)
Row 11: Ch 1, SC (1)
Row 12: Ch 1, 3 SC (3)
Row 13: Ch 1, SC across (3)
Row 14: Ch 1, 2 SC, SC, 2 SC (5)
Row 15: Ch 1, SC across (5)
Row 16: Ch 1, 2 SC, SC in next 3, 2 SC (7)
Row 17: Ch 1, SC across (7)
Row 18: Ch 1, SC2TOG, SC in next 3, SC2TOG (5)
Row 19: Ch 1, SC across (5)
Row 20: Ch 1, SC2TOG, SC, SC2TOG (3)
Row 21: Ch 1, SC across (3)
Fold this piece together so that the fold is at Row 11, and Row 1 and 21 are touching. SC around the raw edge working through both layers. When you get back to the point where Row 1 and 21 start, you will begin working in Rows again to create the fish tail:
Row 22: Ch 1, SC across working through both layers (3)
Row 23: Ch 1, 2 SC, SC, 2 SC (5)
Row 24: Ch 1, SC across (5)
Row 25: Ch 1, 2 SC, SC in 3, 2 SC (7)
Row 26: Ch 2, DC in 2, HDC, Sl St, HDC, DC in 2 (7) Tie off and weave in ends.
Decorate face with non-toxic puffy paint
Starfish (in ‘School Bus Yellow’):
**Special Note: The Ch 6 will count as a stitch
Start with Magic Circle
Round 1: Ch 2, work 10 DC into magic circle
Round 2: *Ch 6, starting in the second ch from the hook, sl st, SC, HDC, DC, DC down the ch, sl st into the next stitch to create one arm of the star, sl st into the next st, repeat from *around until you have 5 points of star. Attach with a sl st to first st of the round. Cut and weave in ends.
Decorate face with non-toxic puffy paint
Jellyfish (in ‘Royal Blue’):
Top of Jellyfish:
Start with Magic Circle
Round 1: Ch 1, work 8 SC into magic circle
Round 2: Ch 1, 2 SC in each st around (16)
Round 3, Ch 1, *2 SC, SC, repeat from *around (24)
Round 4-7: Ch 1, SC around (24). Cut and tie off yarn
Decorate face with non-toxic puffy paint
Bottom of Jellyfish:
Start with Magic Circle
Round 1: Ch 1, work 8 SC into magic circle
Round 2: Ch 1, 2 SC in each st around (16)
Round 3, Ch 1, *2 SC, SC, repeat from *around (24)
Place this circle in the bottom of the Jellyfish top and, working through both layers, SC around to attach them. Tie off and weave in ends. Cut 4 pieces of yarn about 6-8 inches long. Pull one end of each yarn piece through so the lengths are even. Tie the ends together so the yarn can’t slip out.
Decorate face with non-toxic puffy paint
More Free Crochet Patterns You'll Love

Find all FREE CROCHET PATTERNS here
Now the legal stuff...You may sell items made from this pattern, but please credit me as the original designer. Also, please do not share the written pattern in print or electronically. The photos on this webpage belong to Megan Meyer of Left in Knots and may not be used for product sales/product listings. You may share a link back to my blog if you would like someone else to see or work with this pattern. Thank you for your cooperation and if you have any questions please feel free to contact me!
This post contains affiliate links. Thank you for supporting free patterns and yarn deals on Left in Knots!