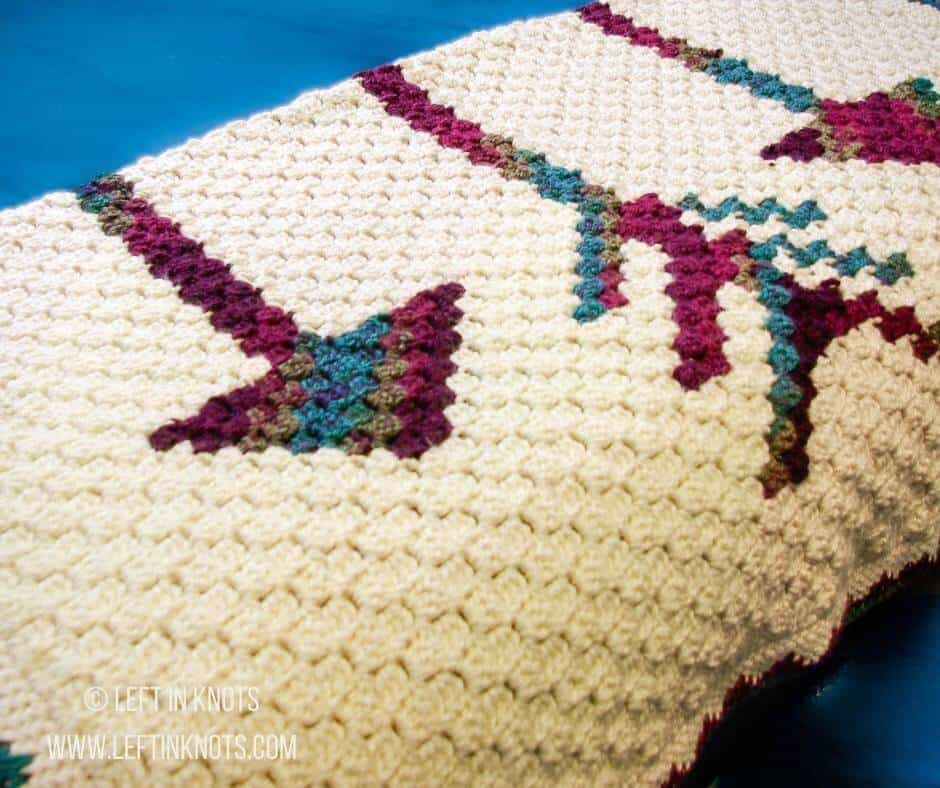
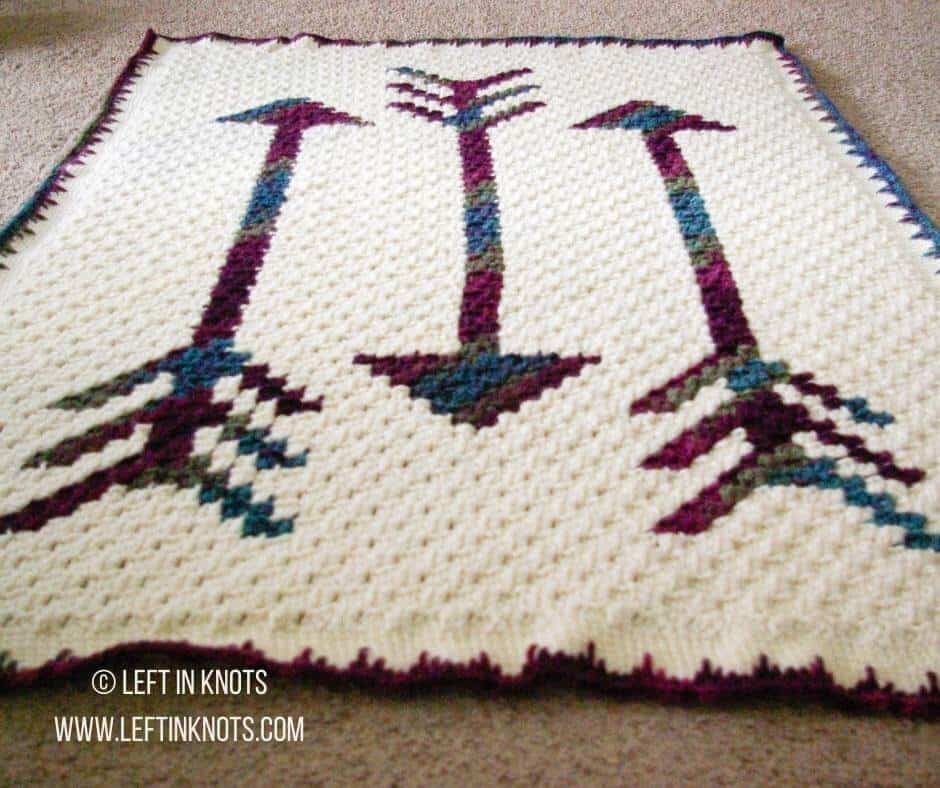
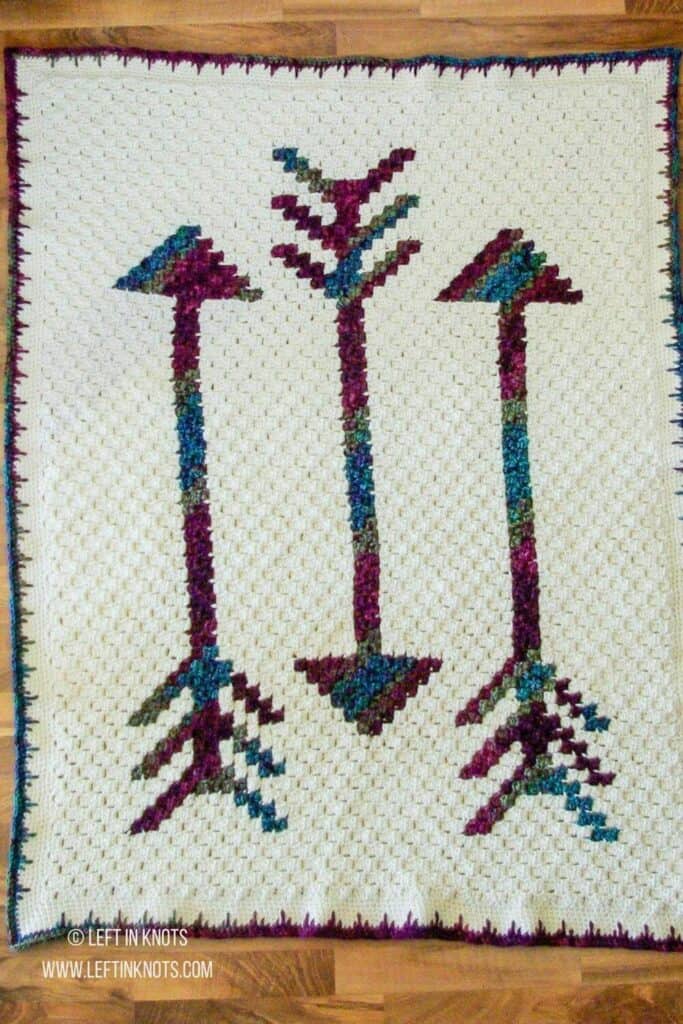
Crochet the C2C Fallen Arrows Blanket with this free pattern and complete C2C stitch video tutorial. This blanket has a modern arrow print that is easy to crochet for beginners learning C2C. Keep reading for the free crochet pattern.
Fallen Arrows Blanket CAL
The Fallen Arrows Blanket originally debuted on my blog as a crochet along. I have since combined the entire pattern into one convenient post.
Make this C2C Blanket with Different Yarn Weights
Since publishing this pattern several years ago I have seen so many wonderful finished projects! One of my favorite things to see if the different types of yarn you choose to make your projects with. I've even seen this made as a smaller baby using worsted weight yarn.
Show off Your Crochet Projects
Don’t forget to share pictures of your projects with me in my Facebook Group or by tagging @leftinknots on Instagram. I can’t wait to see what you make!
Supplies
- 15 skeins (1635 yards) of Loops and Threads Charisma in color 'Off-White' or color of your choice (MOST colors have skeins that are 109 yards, if you choose a color that has less, make sure you purchase extra skeins!)
- 4 skeins (436 yards) of Loops and Threads Charisma in color 'Mulberry Bush' or color of your choice
- 7.0 mm crochet hook (I used Clover Amour)
Abbreviations:
Ch: Chain
sl st: Slip stitch
SC: single crochet
HDC: Half double crochet
shortsp: short spike stitch
longsp: long spike stitch
Special Stitch
This blanket it constructed with the Half Double Crochet Corner to Corner stitch (C2C).
Starting row of C2C: Ch 5, HDC in third ch from the hook and in the next two ch sts (3 HDC). This makes your first "pixel" square.
Increase row of C2C: Ch 5, HDC in third ch from the hook and in the next two ch sts, *sl st into the next ch 2 space from the previous row, ch 2 and work 3 HDC into the ch 2 space of the previous row. Repeat from * across until you have worked 3 HDC into each ch 2 space from the previous row. Each row will increase by one pixel (e.g. Row 2 = 2 pixels, Row 3 = 3 pixels, etc.)
C2C Maintaining Row: "maintaining" rows are what I like to call rows that maintain their stitch count over several rows. This allows you to create a rectangular piece with the C2C stitch. In this pattern, you will continue to increase on the right side (by one square), but you will decrease on the left side (by one square)
C2C Decreasing Row: this portion of the pattern uses decreasing rows. Your "square" count will decrease by one each row. In part two, you made "maintaining" rows by increasing on one side of the project and decreasing on the other. Now, you will decrease on both sides of the project.
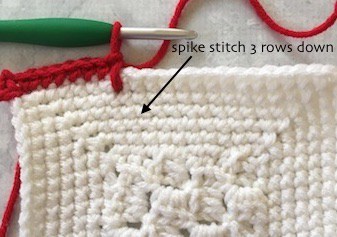
short spike: work a SC stitch like usual, except you will insert your hook one row below the space you would normally work into.
long spike: work a SC stitch like usual, except you will insert your hook three rows below the space you would normally work into.'
Helpful Video Tutorials
Complete C2C Crochet Tutorial (find the left handed video here)
Gauge
5 square x 5 squares = 4" in C2C (using HDC)
Finished Size:
44" x 57"
Pattern Notes:
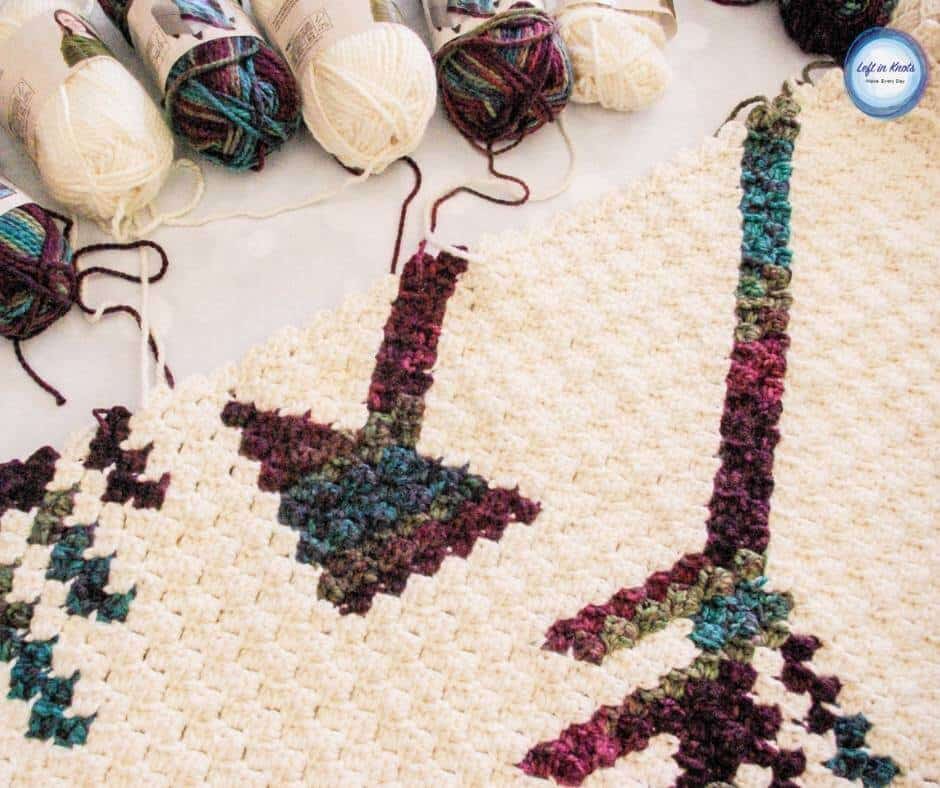
- You can choose to work with multiple skeins/bobbins (as I have pictured) or you can opt to "carry" your yarn throughout your project. It is a personal preference and I demonstrate both methods in the video tutorial.
- If you choose to follow the written color changes PLEASE reference the chart also as you go! It is always much easier to catch mistakes right away instead of a few rows past it. For the written instructions, odd rows are worked "left to right" and even rows are worked "right to left" in reference to the chart.
- In my example, Color A = Off White and Color B = Mulberry Bush
- The border starts where you left off from your last C2C stitch. Start by working in the direction of your nearest corner (reference the photo or video tutorial if you need to see what I mean)
- Work 5 SC sts per 2 squares of C2C. On your long edges, you will have one extra square. Work 2 sts into your extra square so that your stitch count comes out correctly for adding the spike stitches.
Written Pattern:
Row 1: 1 A
Row 2: 2 A
Row 3: 3 A
Row 4: 4 A
Row 5: 5 A
Row 6: 6 A
Row 7: 7 A
Row 8: 8 A
Row 9: 9 A
Row 10: 10 A
Row 11: 11 A
Row 12: 6 A, 1 B, 5 A
Row 13: 5 A, 1 B, 7 A
Row 14: 7 A, 1 B, 6 A
Row 15: 6 A, 1 B, 8 A
Row 16: 6 A, 1 B, 1 A, 1 B, 7 A
Row 17: 7 A, 1 B, 1 A, 1 B, 7 A
Row 18: 7 A, 1 B, 1 A, 1 B, 8 A
Row 19: 8 A, 1 B, 1 A, 1 B, 8 A
Row 20: 6 A, 1 B, 1 A, 1 B, 1 A, 2 B, 8 A
Row 21: 8 A, 2 B, 1 A, 1 B, 1 A, 1 B, 7 A
Row 22: 7 A, 1 B, 1 A, 1 B, 1 A, 6 B, 5 A
Row 23: 5 A, 8 B, 1 A, 1 B, 8 A
Row 24: 8A, 1 B, 1 A, 3 B, 11 A
Row 25: 12 A, 2 B, 1 A, 1 B, 9 A
Row 26: 9 A, 1 B, 1 A, 6 B, 9 A
Row 27: 9 A, 8 B, 10 A
Row 28: 10 A, 3 B, 15 A
Row 29: 16 A, 2 B, 11 A
Row 30: 11 A, 6 B, 13 A
Row 31: 13 A, 7 B, 11 A
Row 32: 11 A, 2 B, 19 A
Row 33: 20 A, 2 B, 11 A
Row 34: 11 A, 2 B, 21 A
Row 35: 22 A, 2 B, 11 A
Row 36: 11 A, 2 B, 23 A
Row 37: 12 A, 6 B, 6 A, 2 B, 11 A
Row 38: 11 A, 2 B, 7 A, 6 B, 6 A, 1 B, 5 A
Row 39: 5 A, 1 B, 7 A, 5 B, 8 A, 2 B, 11 A
Row 40: 11 A, 2 B, 9 A, 5 B, 6 A, 1 B, 6 A
Row 41: 6 A, 1 B, 7 A, 4 B, 10 A, 2 B, 11 A
Row 42: 11 A, 2 B, 11 A, 4 B, 4 A, 1 B, 1 A, 1 B, 7 A
Row 43: 7 A, 1 B, 1 A, 1 B, 5 A, 4 B, 11 A, 2 B, 11 A
Row 44: 11 A, 2 B, 11 A, 5 B, 4 A, 1 B, 1 A, 1 B, 8 A
Row 45: 8 A, 1 B, 1 A, 1 B, 5 A, 2 B, 1 A, 2 B, 11 A, 2 B, 11 A
Row 46: 11 A, 2 B, 11 A, 2 B, 2 A, 2 B, 2 A, 1 B, 1 A, 1 B, 1 A, 2 B, 8 A
Row 47: 8 A, 2 B, 1 A, 1 B, 1 A, 1 B, 3 A, 1 B, 3 A, 2 B, 11 A, 2 B, 11 A
Row 48: 11 A, 2 B, 11 A, 2 B, 4 A, 1 B, 2 A, 1 B, 1 A, 1 B, 1 A, 6 B, 5 A
Row 49: 5 A, 8 B, 1 A, 1 B, 8 A, 2 B, 11 A, 2 B, 11 A
Row 50: 11 A, 2 B, 11 A, 2 B, 8 A, 1 B, 1 A, 3 B, 11 A
Row 51: 11 A, 2 B, 1 A, 1 B, 9 A, 2 B, 11 A, 2 B, 11 A (increase)
Row 52: (increase) 11 A, 2 B, 11 A, 2 B, 9 A, 1 B, 1 A, 6 B, 7 A
Row 53: 6 A, 8 B, 10 A, 2 B, 11 A, 2 B, 11 A
Row 54: 6 A, 1 B, 4 A, 2 B, 11 A, 2 B, 10 A, 3 B, 11 A
Row 55: 11 A, 2 B, 11 A, 2 B, 11 A, 2 B, 3 A, 1 B, 7 A
Row 56: 7 A, 2 B, 2 A, 2 B, 11 A, 2 B, 11 A, 6 B, 7 A
Row 57: 6 A, 7 B, 11 A, 2 B, 11 A, 2 B, 1 A, 2 B, 8 A
Row 58: 8 A, 5 B, 11 A, 2 B, 11 A, 2 B, 11 A
Row 59: 11 A, 2 B, 11 A, 2 B, 11 A, 4 B, 9 A
Row 60: 9 A, 4 B, 11 A, 2 B, 11 A, 2 B, 11 A
Row 61: 11 A, 2 B, 11 A, 2 B, 10 A, 4 B, 10 A
Row 62: 10 A, 5 B, 9 A, 2 B, 11 A, 2 B, 11 A
Row 63: 11 A, 2 B, 11 A, 2 B, 8 A, 5 B, 11 A
Row 64: 11 A, 6 B, 7 A, 2 B, 11 A, 2 B, 11 A
Row 65: 11 A, 2 B, 11 A, 2 B, 6 A, 6 B, 12 A
Row 66: 23 A, 2 B, 11 A, 2 B, 11 A
Row 67: 11 A, 2 B, 11 A, 2 B, 22 A
Row 68: 21 A, 2 B, 11 A, 2 B, 11 A
Row 69: 11 A, 2 B, 11 A, 2 B, 20 A
Row 70: 19 A, 2 B, 11 A, 2 B, 11 A
Row 71: 11 A, 2 B, 11 A, 7 B, 13 A
Row 72: 13 A, 6 B, 11 A, 2 B, 11 A
Row 73: 11 A, 2 B, 11 A, 2 B, 16 A
Row 74: 15 A, 3 B, 10 A, 2 B, 11 A
Row 75: 11 A, 2 B, 10 A, 8 B, 9 A
Row 76: 9 A, 6 B, 1 A, 1 B, 9 A, 2 B, 11 A
Row 77: 11 A, 2 B, 9 A, 1 B, 1 A, 2 B, 12 A
Row 78: 11 A, 3 B, 1 A, 1 B, 8 A, 2 B, 11 A
Row 79: 11 A, 2 B, 8 A, 1 B, 1 A, 8 B, 5 A
Row 80: 5 A, 6 B, 1 A, 1 B, 1 A, 1 B, 2 A, 1 B, 4 A, 2 B, 11 A
Row 81: 11 A, 2 B, 3 A, 1 B, 3 A, 1 B, 1 A, 1 B, 1 A, 2 B, 8 A
Row 82: 8 A, 2 B, 1 A, 1 B, 1 A, 1 B, 2 A, 2 B, 2 A, 2 B, 11 A
Row 83: 11 A, 2 B, 1 A, 2 B, 5 A, 1 B, 1 A, 1 B, 8 A
Row 84: 8 A, 1 B, 1 A, 1 B, 4 A, 5 B, 11 A
Row 85: 11 A, 4 B, 5 A, 1 B, 1 A, 1 B, 7 A
Row 86: 7 A, 1 B, 1 A, 1 B, 4 A, 4 B, 11 A
Row 87: 10 A, 4 B, 7 A, 1 B, 6 A
Row 88: 6 A, 1 B, 6 A, 5 B, 9 A
Row 89: 8 A, 5 B, 7 A, 1 B, 5 A
Row 90: 5 A, 1 B, 6 A, 6 B, 7 A
Row 91: 6 A, 6 B, 12 A
Row 92: 23 A
Row 93: 22 A
Row 94: 21 A
Row 95: 20 A
Row 96: 19 A
Row 97: 18 A
Row 98: 17 A
Row 99: 16 A
Row 100: 15 A
Row 101: 14 A
Row 102: 13 A
Row 103: 12 A
Row 104: 11 A
Row 105: 10 A
Row 106: 9 A
Row 107: 8 A
Row 108: 7 A
Row 109: 6 A
Row 110: 5 A
Row 111: 4 A
Row 112: 3 A
Row 113: 2 A
Row 114: 1 A
Blanket Border
Round 1 (with color A): Ch 1, SC two sts to reach the first corner, ch 2 to turn the corner, SC across (125 worked along the short side of the piece), ch 2 to turn the corner, SC across (162 worked along the long side of the piece), ch 2 to turn the corner, SC across (125 worked along the short side of the piece), ch 2 to turn the corner, SC across (160 to reach your first SC of the round). Attach with a sl st to the first st of the round.
Round 2: ch 1, SC 2 to the ch 2 space from the previous row, [SC, ch 2, SC] in the ch 2 space, SC across (125), [SC, ch 2, SC] in the next ch 2 space, SC across (162), [SC, ch 2, SC] in the ch 2 space, SC across (125), [SC, ch 2, SC] in the corner, SC across (160). Attach with a sl st to the first st of the round.
Round 3: ch 1, SC 3 to the ch 2 space from the previous row, [SC, ch 2, SC] in the ch 2 space, SC across (127), [SC, ch 2, SC] in the next ch 2 space, SC across (164), [SC, ch 2, SC] in the ch 2 space, SC across (127), [SC, ch 2, SC] in the corner, SC across (161). Attach with a sl st to the first st of the round.
Round 4: ch 1, SC 4 to the ch 2 space from the previous row, [SC, ch 2, SC] in the ch 2 space, SC across (129), [SC, ch 2, SC] in the next ch 2 space, SC across (166), [SC, ch 2, SC] in the ch 2 space, SC across (129), [SC, ch 2, SC] in the corner, SC across (162). Attach with a sl st to the first st of the round.
Round 5: ch 1, SC 5 to the ch 2 space from the previous row, [SC, ch 2, SC] in the ch 2 space, SC across (131), [SC, ch 2, SC] in the next ch 2 space, SC across (168), [SC, ch 2, SC] in the ch 2 space, SC across (131), [SC, ch 2, SC] in the corner, SC across (163). Attach with a sl st to the first st of the round.
Round 6: ch 1, SC 6 to the ch 2 space from the previous row, [SC, ch 2, SC] in the ch 2 space, SC across (133), [SC, ch 2, SC] in the next ch 2 space, SC across (170), [SC, ch 2, SC] in the ch 2 space, SC across (133), [SC, ch 2, SC] in the corner, SC across (164). Attach with a sl st to the first st of the round.
Round 7 (with color B): attach your yarn in the corner so that you will be working into a short side of your blanket first. [SC, ch 2, SC] in the ch 2 space, SC in 5, *sc, shortsp, longsp, shortsp, sc, repeat from * 24 MORE times (for a total of 25 spike sequences), SC in 5, [SC, ch 2, SC] in the ch 2 space, SC in 6, *sc, shortsp, longsp, shortsp, sc, repeat from * 31 MORE times (for a total of 32 spike sequences), SC in 6, continue this round by repeating the short side and long side instructions one more time. Sl st to the first st of the round.
Round 8: still working with color B, ch 1, SC, [SC, ch 2, SC] in the ch 2 space, SC across (137), [SC, ch 2, SC] in the ch 2 space, SC across (174),[SC, ch 2, SC] in the ch 2 space, SC across (137), [SC, ch 2, SC] in the ch 2 space, SC across (173). Join to the first st of the round with a sl st. Tie off and weave in all the ends.
Now the legal stuff...You may sell items made from this pattern, but please credit me as the original designer. Also, please do not share the written pattern in print or electronically. The photos on this webpage belong to Megan Meyer of Left in Knots and may not be used for product sales/product listings. You may share a link back to my blog if you would like someone else to see or work with this pattern. Thank you for your cooperation and if you have any questions please feel free to contact me!
This post contains affiliate links. Thank you for supporting free patterns and yarn deals from Left in Knots!